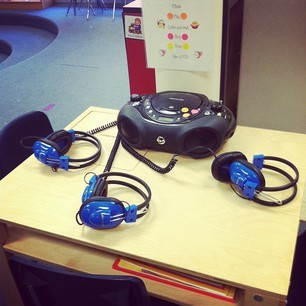
One of my most *successful* literacy workstations is the Listening Station. It's successful for several reasons:

However, it was not always successful. When I first started my listening station, the kids were frustrated with using the equipment, there were cords everywhere, the books and CDs were always getting mixed up, and worst of all -- small group instruction was constantly being interrupted.
Here are the "tips and tricks" that have helped the listening station become a fail-proof favorite in our classroom:

A great table -- with storage! I received this table through a Donorschoose.org donation, and it's been wonderful over the last 4 years. It's sturdy, adjustable, and saves TONS of space.
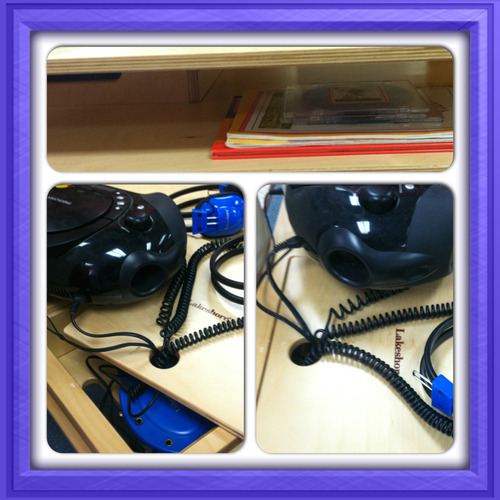
This table (from Lakeshore Learning) has a slot for storing books and CDs, as well as a "well" in the table for hiding cords and a junction box. The "well" also has a hole in the bottom to run a cord to an electrical outlet. It can seat up to 4 students comfortably.

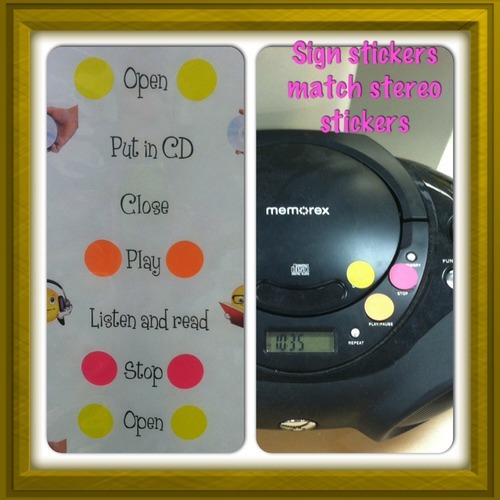
Simple step-by-step guidelines. This seems so easy, but it took me a while to figure it out! Using colorful dot stickers, I "labeled" the open, play, and stop buttons. I typed up a list of the directions (with accompanying clipart) and added matching dot stickers. Slip the page into a sheet protector and hang up near the station! I've kept the same poster for 4 years and the kids have never had any trouble. I often replace the dot stickers on the CD player, however.

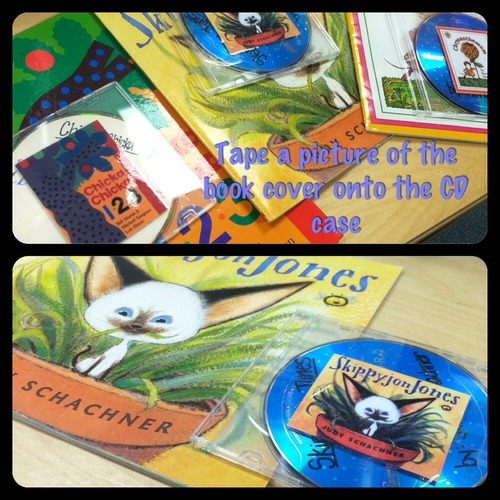
Matching CDs and books. I have almost 100 stories on CD -- so how do we keep them all straight? First, I copy the stories onto my iTunes and burn them onto blank CDs (one story per CD). This way, if a CD is scratched, I still have the original.
Next, I use Google Images to find a picture of the book's front cover. Using clear packing tape, I attach the picture to the front of a slim CD case. Done!
I usually keep 3 sets of books & CDs at the station at a time -- and rotate every 1-2 weeks.

Lastly... two tips for building a CHEAP listening station library:
- It strengthens early literacy skills.
- The kids are able to use it independently!
- It's a year-round station that is easy to update.
- The kids love it.

However, it was not always successful. When I first started my listening station, the kids were frustrated with using the equipment, there were cords everywhere, the books and CDs were always getting mixed up, and worst of all -- small group instruction was constantly being interrupted.
Here are the "tips and tricks" that have helped the listening station become a fail-proof favorite in our classroom:

A great table -- with storage! I received this table through a Donorschoose.org donation, and it's been wonderful over the last 4 years. It's sturdy, adjustable, and saves TONS of space.
This table (from Lakeshore Learning) has a slot for storing books and CDs, as well as a "well" in the table for hiding cords and a junction box. The "well" also has a hole in the bottom to run a cord to an electrical outlet. It can seat up to 4 students comfortably.

Simple step-by-step guidelines. This seems so easy, but it took me a while to figure it out! Using colorful dot stickers, I "labeled" the open, play, and stop buttons. I typed up a list of the directions (with accompanying clipart) and added matching dot stickers. Slip the page into a sheet protector and hang up near the station! I've kept the same poster for 4 years and the kids have never had any trouble. I often replace the dot stickers on the CD player, however.

Matching CDs and books. I have almost 100 stories on CD -- so how do we keep them all straight? First, I copy the stories onto my iTunes and burn them onto blank CDs (one story per CD). This way, if a CD is scratched, I still have the original.
Next, I use Google Images to find a picture of the book's front cover. Using clear packing tape, I attach the picture to the front of a slim CD case. Done!
I usually keep 3 sets of books & CDs at the station at a time -- and rotate every 1-2 weeks.

Lastly... two tips for building a CHEAP listening station library:
- Buy audiobook tracks for books you already own. Amazon and iTunes often have readings for 99 cents.
- Record yourself and other "well-known" staff members. I have several stories recorded by myself, our school principal, P.E. teacher, and librarian. The kids love it and are always thrilled to hear a familiar voice. Best of all... it's free!
No comments:
Post a Comment
Thanks for stopping by!