My kinders seriously love these. They sing them all the time.
I absolutely love overhearing one of my students singing it quietly while writing a number independently. Just pulls at my heart strings. Too sweet.
Even better... we have been introducing the correct "technique" for writing each number -- one number each day. The kids beg for me to introduce another one. But nope. One per day. As I always say...
"I guess you'll have to come back to school tomorrow..."
I thought I'd share my personal version of the number writing rhymes. There are tons of versions out there, but here is the 0-9 set I have tweeked and made work for me. This is a *great* way to practice at home, too!
Click HERE or on the picture above for the printable. Enjoy!
Showing posts with label classroom. Show all posts
Showing posts with label classroom. Show all posts
Wednesday, October 10, 2012
Number writing rhymes
Friday, October 5, 2012
Apples and pumpkins
To transition from our unit on apples to our unit on pumpkins, we have been comparing the 2 fruits -- both great for the Fall!
I love saving the last 15-20 minutes of the day for old-school traditional units. You know... apples, pumpkins, insects, animals, holidays, etc. They are a great way to get the kids interested in literature, shared writing, questions, charts, graphic organizers, etc.
Evidence: This adorable Venn diagram. Yes, it's cutesy (I love it!), but it was a very valuable tool this week. We ended our day all week by sitting at the carpet and reading a non-fiction book about pumpkins. The kids then suggested facts to add to the poster -- comparing apples (from the last 2 weeks) to pumpkins.
Every one of my kids was able to tell their fact (ex: "They're both round.") and point to where on the diagram it should go (ex: in the middle). Great, valuable way to use the last 15 minutes of the school day (a.k.a. the death hour in kindergarten).
Wednesday, October 3, 2012
The "Crayon Cup Fairy" came today!
In our classroom, we use "crayons cups" to hold our crayons and pencil. I'm pretty particular with the kids about taking care of them.
Needless to say, some of them take better care of theirs than others! :)
A co-worker of mine has the "Desk Fairy" visit her classroom to reward her first graders who keep their desks clean.
So... the CRAYON CUP FAIRY came to our classroom before school today! She left stars all over the floor and a note on the board.
She even left a special treat for four kinders who take *extra special* care of their crayon cups. The kids LOVED it... and I loved how it really reinforces responsibility in the classroom.
I made a printable for anyone who wants to have a "fairy" to visit their classroom. I included cards for four "varieties" -- crayon cup, pencil box, cubby, and desk!
Click HERE or on the picture above for the printable cards!
Sunday, September 9, 2012
a couple science favorites
These two items have really enhanced my classroom science instruction and the classroom science station:

A simple reminder that scientists' drawings should be ABCD.

Instead of a science word wall, make a science OBJECT wall. At the beginning of each unit, I select 5 target vocab words - must be concrete and meaningful! Then, we start the unit with a mini-lesson in which we create the object wall as a class and share where we've seen these objects before, what we observe about them, what we think they might be used for, etc.
I love my kinder scientists!
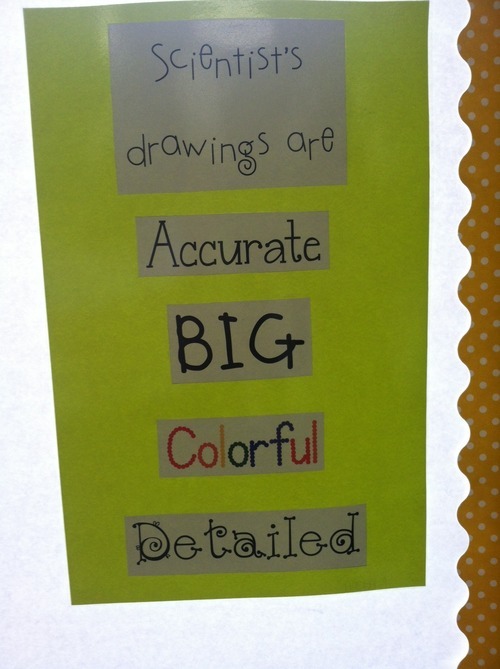
A simple reminder that scientists' drawings should be ABCD.
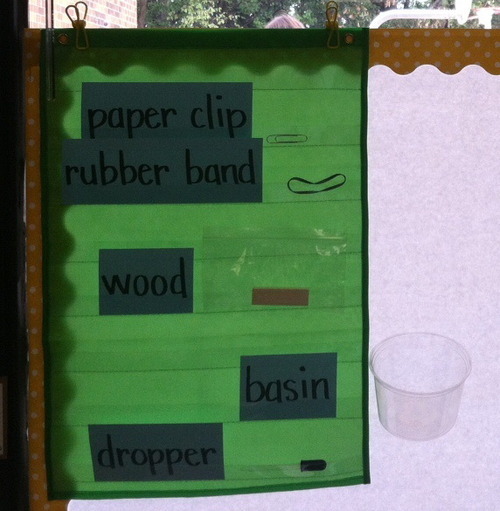
Instead of a science word wall, make a science OBJECT wall. At the beginning of each unit, I select 5 target vocab words - must be concrete and meaningful! Then, we start the unit with a mini-lesson in which we create the object wall as a class and share where we've seen these objects before, what we observe about them, what we think they might be used for, etc.
I love my kinder scientists!
Saturday, September 8, 2012
What is a scientist?
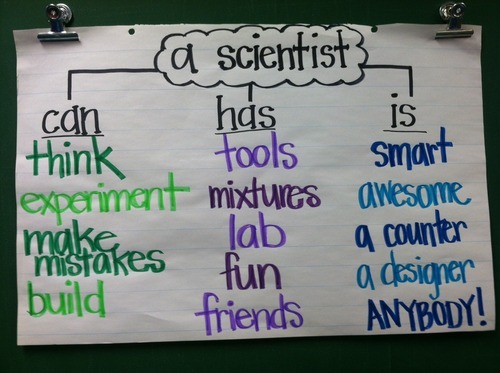
Student-generated responses after read-alouds and discussion. Love this anchor chart!
Thursday, August 2, 2012
i LOVE our classroom library!
I'm an avid picture book collector... okay, let's be honest. I'm obsessed with books. I think the most valuable way to spend time with a child is to read. I read-aloud at least 3 books a day to my class... often 5-6 a day. I *love* having the perfect book to teach a literature skill, or explain a science concept, or fit with a seasonal theme.
Every primary teacher knows the FRUSTRATION of organizing classroom books. We want the books to be:

It took me a couple years to get it just right, but now I LOVE our classroom library! Best of all, the kids LOVE it, too. My students know that books are highly valued in our classroom -- and they are always accessible to both myself and the students.

I started by sorting my books. I'm not gonna lie to you... this took a whole afternoon! I cleared off all my classroom tables and just started sorted. I had to adjust and re-sort many times. But, I ended up with 30-40 categories.
The easiest ones to start with are seasonal (Spring, Summer, Fall, and Winter categories) and holidays (such as Halloween and Christmas). I then moved on to favorite authors and characters. I filled in with themes (such as bears) and subjects (such as social studies). I ended up with some "general" categories, too (such as animal non-fiction, animal fiction, and family and friends).

Now... the busy part! I collected several HUNDRED address labels (I bought mine on sale at OfficeMax) -- one for each book. Using Microsoft Word and Google Images, I created 1 label sheet for each category. I printed off at least one sheet of each category (several sheets for popular categories... such as animal fiction). Each book gets a label on the BACK COVER.
Once all the books are labeled, pick containers that fit your books and fit on your shelves. I used "shoe box" size containers -- with no lids. I found them at Wal-Mart, in 12 packs for $6.00 (only 50 cents a piece!) Figure out which categories will fit into the boxes and place a corresponding label for each category on the front of the box.
BEST PARTS of this system:
Every primary teacher knows the FRUSTRATION of organizing classroom books. We want the books to be:
- Organized
- Accessible to the teacher
- Accessible to students
- Safe
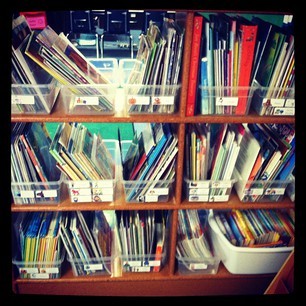
It took me a couple years to get it just right, but now I LOVE our classroom library! Best of all, the kids LOVE it, too. My students know that books are highly valued in our classroom -- and they are always accessible to both myself and the students.
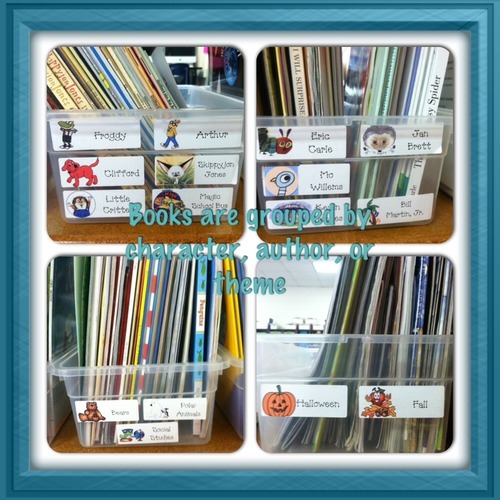
I started by sorting my books. I'm not gonna lie to you... this took a whole afternoon! I cleared off all my classroom tables and just started sorted. I had to adjust and re-sort many times. But, I ended up with 30-40 categories.
The easiest ones to start with are seasonal (Spring, Summer, Fall, and Winter categories) and holidays (such as Halloween and Christmas). I then moved on to favorite authors and characters. I filled in with themes (such as bears) and subjects (such as social studies). I ended up with some "general" categories, too (such as animal non-fiction, animal fiction, and family and friends).
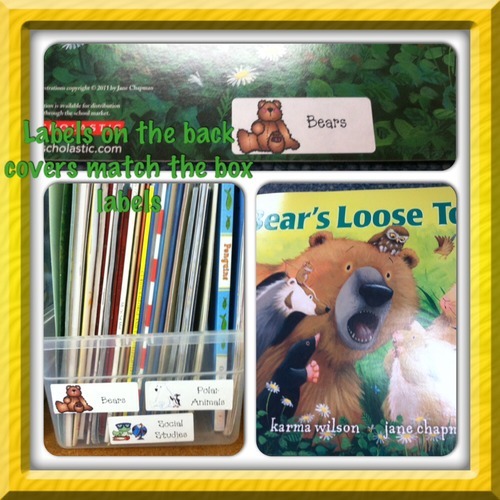
Now... the busy part! I collected several HUNDRED address labels (I bought mine on sale at OfficeMax) -- one for each book. Using Microsoft Word and Google Images, I created 1 label sheet for each category. I printed off at least one sheet of each category (several sheets for popular categories... such as animal fiction). Each book gets a label on the BACK COVER.
Once all the books are labeled, pick containers that fit your books and fit on your shelves. I used "shoe box" size containers -- with no lids. I found them at Wal-Mart, in 12 packs for $6.00 (only 50 cents a piece!) Figure out which categories will fit into the boxes and place a corresponding label for each category on the front of the box.
BEST PARTS of this system:
- The kids can find AND PUT AWAY books independently!
- I can always find the book I'm looking for.
A *successful* listening station
One of my most *successful* literacy workstations is the Listening Station. It's successful for several reasons:

However, it was not always successful. When I first started my listening station, the kids were frustrated with using the equipment, there were cords everywhere, the books and CDs were always getting mixed up, and worst of all -- small group instruction was constantly being interrupted.
Here are the "tips and tricks" that have helped the listening station become a fail-proof favorite in our classroom:

A great table -- with storage! I received this table through a Donorschoose.org donation, and it's been wonderful over the last 4 years. It's sturdy, adjustable, and saves TONS of space.
This table (from Lakeshore Learning) has a slot for storing books and CDs, as well as a "well" in the table for hiding cords and a junction box. The "well" also has a hole in the bottom to run a cord to an electrical outlet. It can seat up to 4 students comfortably.

Simple step-by-step guidelines. This seems so easy, but it took me a while to figure it out! Using colorful dot stickers, I "labeled" the open, play, and stop buttons. I typed up a list of the directions (with accompanying clipart) and added matching dot stickers. Slip the page into a sheet protector and hang up near the station! I've kept the same poster for 4 years and the kids have never had any trouble. I often replace the dot stickers on the CD player, however.

Matching CDs and books. I have almost 100 stories on CD -- so how do we keep them all straight? First, I copy the stories onto my iTunes and burn them onto blank CDs (one story per CD). This way, if a CD is scratched, I still have the original.
Next, I use Google Images to find a picture of the book's front cover. Using clear packing tape, I attach the picture to the front of a slim CD case. Done!
I usually keep 3 sets of books & CDs at the station at a time -- and rotate every 1-2 weeks.

Lastly... two tips for building a CHEAP listening station library:
- It strengthens early literacy skills.
- The kids are able to use it independently!
- It's a year-round station that is easy to update.
- The kids love it.
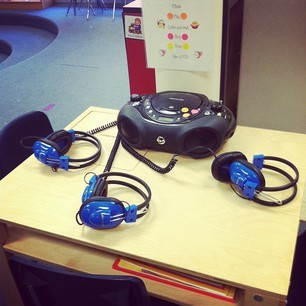
However, it was not always successful. When I first started my listening station, the kids were frustrated with using the equipment, there were cords everywhere, the books and CDs were always getting mixed up, and worst of all -- small group instruction was constantly being interrupted.
Here are the "tips and tricks" that have helped the listening station become a fail-proof favorite in our classroom:
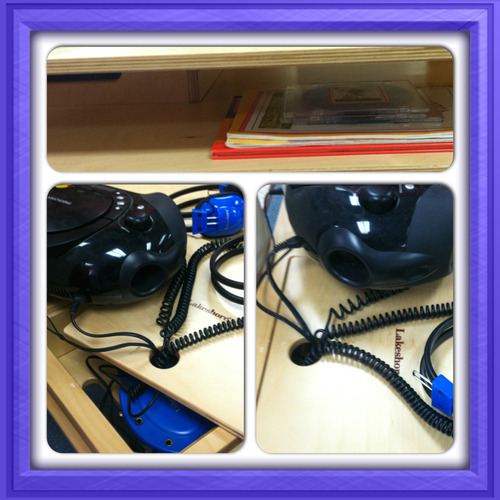
A great table -- with storage! I received this table through a Donorschoose.org donation, and it's been wonderful over the last 4 years. It's sturdy, adjustable, and saves TONS of space.
This table (from Lakeshore Learning) has a slot for storing books and CDs, as well as a "well" in the table for hiding cords and a junction box. The "well" also has a hole in the bottom to run a cord to an electrical outlet. It can seat up to 4 students comfortably.
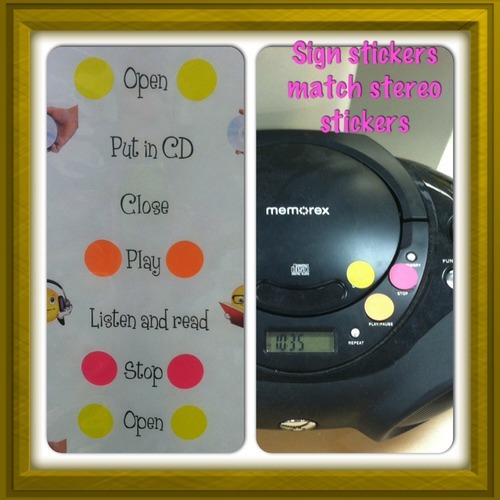
Simple step-by-step guidelines. This seems so easy, but it took me a while to figure it out! Using colorful dot stickers, I "labeled" the open, play, and stop buttons. I typed up a list of the directions (with accompanying clipart) and added matching dot stickers. Slip the page into a sheet protector and hang up near the station! I've kept the same poster for 4 years and the kids have never had any trouble. I often replace the dot stickers on the CD player, however.
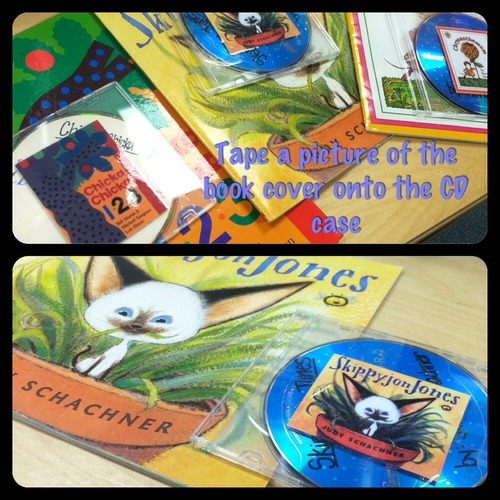
Matching CDs and books. I have almost 100 stories on CD -- so how do we keep them all straight? First, I copy the stories onto my iTunes and burn them onto blank CDs (one story per CD). This way, if a CD is scratched, I still have the original.
Next, I use Google Images to find a picture of the book's front cover. Using clear packing tape, I attach the picture to the front of a slim CD case. Done!
I usually keep 3 sets of books & CDs at the station at a time -- and rotate every 1-2 weeks.

Lastly... two tips for building a CHEAP listening station library:
- Buy audiobook tracks for books you already own. Amazon and iTunes often have readings for 99 cents.
- Record yourself and other "well-known" staff members. I have several stories recorded by myself, our school principal, P.E. teacher, and librarian. The kids love it and are always thrilled to hear a familiar voice. Best of all... it's free!
Labels:
classroom,
literacy workstations,
organization,
TEACH
Subscribe to:
Posts (Atom)


